Showing posts with label Desserts. Show all posts

3/17/2011

M'hanncha (coiled like a snake) two ways...


This popular Moroccan recipe is simply divine. The name Um'hanncha translate's to "Coiled like a snake" and it will fly off of your dessert table faster than a snake I guarantee. The traditional filling is made of Almond paste scented with orange blossom water and spiced with cinnamon powder. I created my own version of M'hanncha using a traditional baklava filling with turned out amazing I must say. Drizzle or drench with honey and decorate with chopped toasted nuts or slivered almonds. M'hanncha can also be served with powder sugar but prefer to serve mine with honey. Cut the M'hanncha with a sarrated knife and serve warm or at room temperature. The pictures you see on this post is what was left of the M'hanncha I served my guest, it was much bigger before.

Ingredients

9 sheets phillo dough (double the amount if you're making both recipes)
1/2 cup melted butter
Honey
rose water
orange blossom water
Toated chopped nuts to decorate

Almond stuffing
2 cups blanched almonds
1 tablespoon butter (room temperature)
1 tablespoon orange blossom water
3/4 teaspoon cinnamon powder
1/3 cup icing sugar (powder sugar) or more to taste.

Directions
Add all of your ingredients into a food processor and process until a smooth paste forms. If the mixture is taking a while to form into a paste, uncover the food processor and mix the almonds with a fork and process again until a smooth paste is formed. Roll the paste into 9 equal sized balls and roll into logs, approximately 4 to 5 inches long. Set aside.

Walnut, Almond, and hazelnut stuffing
2 tablespoons lemon juice
4 tablespoon clear thick honey
1/4 cup sugar
2 teaspoons cinnamon powder
1 3/4 cups blanched almonds
1 3/4 cups walnuts (toasted)
3/4 cup hazelnuts

Directions
Add 2/3 of your nut mixture into the food processor and process until a fine mixture is formed (it wont be a paste). Pulse the remainder of your nuts until bread crumb size nuts form, mix both together in a large bowl. Set aside. Place the lemon juice, honey, and sugar in a pan and heat gently, stirring continuously until the sugar has completely dissolved. Stir in the cinnamon and nuts and stirr to combine. Remove the mixture from the heat and allow it to come to room temperature.

How to assemble the pastry

Almond filling
Place 1 sheet of phyllo dough on a clean surface and brush with butter, add two more sheets brushing each time with butter. Place 3 logs on the edge of the pastry nearest to you and roll the pastry up tightly, sealing the edges. Repeat the process with the remainder of phyllo dough and almond logs. Coil the first log into a spiral and continue with the 2 rolls until a snake like pastry is formed. If your pastry tears, seal with a piece of leftover phyllo dough and brush with butter. Place on a buttered round baking dish and brush the entire snake with melted butter. Bake in a 350*F preheated oven for approximately 25 minutes or until golden in color. Cool slightly and drizzle with warm honey and scented water mix. If you're making an almond filled M'hanncha mix the honey with orange blossom water to taste and heat over medium heat.


Mixed nut filling
Place 1 sheet of phyllo dough on a clean surface and brush with butter, add two more sheets brushing each time with butter. Hand form a log using 1/3 of your nut mixture 2 inches from the edge of pastry nearest to you and fold over pressing tightly, roll the pastry tightly to form a log. Continue with the remainder of pastry and nut filling. Coil each log around each other closing the edges tightly until a snake like coil spiral is formed. Place onto a buttered round pan and bake for approximately 25 minutes or until golden in color. Cool slightly before you add a honey mixture. Mixed nut M'hanncha goes well with rose water scented honey and sprinkled with chopped nuts.

Note, you can either drizzle the spirals with honey or drench. If you would rather cover with powder sugar, allow the M'hanncha to cool completely before dusting. Adding honey to the M'hanncha with start to lift up the pastry sheets, so if you're not serving on the same day and would like to have a flawless presentation, do not cover with honey until the day you're serving the M'hanncha. Warm the M'hanncha for a couple of minutes under low broil before covering with honey.

US phyllo dough VS Middle Eastern phyllo dough.

After my experience baking with phyllo dough, I find that Middle Eastern phyllo is much thicker than American Phyllo dough, if you're using Middle Eastern sold dough, you can use 2 sheets of Phyllo per log and cut the dough into a 17 by 12 inch rectangle.

2/05/2011

World Nutella Day 2011...

Hazelnut chocolate, pear cake (with nutella)...


Photobucket


This is the first time I participate in "World Nutella Day" but almost certain it wont be the last time. Nutella is the number one spread in my home and a must have in my pantry. I was just taking a look in my cabinets and I have quite the collection of empty nutella jars, that by the way make great cups. I was feeling a bit hesitant at first and wasn't sure I would participate in this "Oh so fabulous" almost my favorite holiday in the world because every recipe that would pop in my head was already out there. But here I am with a fabulous cake recipe made with chocolate morsels, hazelnuts, pears, and best of all Nutella. Pear this cake (haha Pear, get it?) with homemade hazelnut icecream and drizzle with warm nutella.


Photobucket


ingredients
1 cup all purpose flour
1/2 cup pastry flour
1 tablespoon baking powder
1/4 teaspoon salt
1 cup sugar
1 teaspoon vanilla
4 eggs
6 tablespoons browned butter
3 tablespoons hazelnut, argan, or almond oil
2 large pears peeled and diced small
3/4 cup bittersweet chocolate morsels
1/4 to 1/3 cup nutella
3/4 to 1 cup toasted hazelnuts
3 tablespoon almond flour

Directions
Preheat your oven to 350*. Butter a 9inch springform pan and dust with 3 tablespoon almond or hazelnut flour (you can dust the pan with regular flour).

(How to brown your butter)
Heat a thick-bottomed skillet on medium heat. Add 6 tablespoons of sliced butter (sliced so that the butter melts more evenly) whisking frequently. Continue to cook the butter. Once the butter begins to foam up a bit, then subside, watch carefully as lightly browned specks begin to form at the bottom of the pan. Smell the butter; it should have a nutty aroma. Remove from heat and place on a cool surface to help stop the butter from cooking further and perhaps burning. I strained my butter to get rid of the small milk solids but you can skip this step. Add your 3 tablespoon of oil. Set aside in a warm place (you can place the cup with your butter on top of the warm stove).

In a large bowl sift you flour, salt, and baking powder. Set aside. In a seperate bowl with and electric whisk or home mixer (kitchen aid, kenwood etc.) whisk your eggs on medium high speed for approximately 5 to 7 minutes or until they become very thick and pale in color.

Once the eggs have thickened, gradually add your sugar and continue to whisk until well combined. With a hand whisk or spatula gently fold in your flour mix alternately with the brown butter and nut oil to your egg and sugar mix. Mix until combined (Do not overmix).

Add 2/3 of your batter into the prepared pan and dot the top with nutella (I used and oiled teaspoon). Add the remainder of your batter over the nutella and top with chopped hazelnuts, chocolate morsels, and chopped pear. Bake the cake for approximately 45 to 55 minutes of until golden in color and tester inserted in the center of the cake comes out clean.

A neat trick to making sure the cake is done and ready to be taken out of the oven is to give your oven a shimmy shake (come on, we've all done that to vending machines.) if the center of the cakes wabbles (is that even a word?) continue baking the cake. It took my cake about 55 minutes to bake evenly.

Allow your cake to cool in the pan for 5 to 7 minutes before removing the rim.


Photobucket


NutellaLicious!!


Photobucket


nutella boy


Photobucket


World Nutella Day 2011


Sara from Ms. Adventures in Italy and Michelle from Bleeding Espresso solemnly declare Saturday, February 5th “World Nutella Day 2011″ – a day to celebrate, to get creative with, and most importantly, to EAT Nutella.


12/27/2010

Caramel sauce


This is the very first time I make homemade caramel sauce other than the very easy to make caramel sauce for flans, of course. OMG, let me just say. WOW! This, like many of Ina Garten's recipe's is amazing. I cut the recipe in half, big mistake. Now I want more. :) Drizzle over cakes, pies, or icecream or you can do like me and make apple cut out shapes with your favorite cookie cutters, dip in the sauce and dust with chopped nuts or almond meal.


Ingredients
nocoupons
1 1/2 cups sugar
1/3 cup water
1 1/4 cups heavy cream
1/2 teaspoon pure vanilla extract

Directions
Mix the water and sugar in a medium heavy-bottomed saucepan. Cook over low heat for 5 to 10 minutes, until the sugar dissolves. Do not stir. Increase the heat to medium and boil uncovered until the sugar turns a warm chestnut brown (about 350 degrees F on a candy thermometer), about 5 to 7 minutes, gently swirling the pan to stir the mixture. Be careful – the mixture is extremely hot! Watch the mixture very carefully at the end, as it will go from caramel to burnt very quickly. Turn off the heat. Stand back to avoid splattering and slowly add the cream and vanilla. Don't worry - the cream will bubble violently and the caramel will solidify.

Simmer over low heat, stirring constantly, until the caramel dissolves and the sauce is smooth, about 2 minutes. Allow to cool to room temperature, at least 4 hours. It will thicken as it sits.


12/22/2010

Apple, turnover cake.


This apple cake is simply "Amazing". I've baked plenty of apple cakes in my life but nothing like this one. My husband is very picky when it comes to adding fresh fruit to cakes which is why I decided to pre cook the apples. He also doesn't like overly sweet desserts, so I kept the apple topping light. The finely ground almonds which dust the edges of the pan are a pleasing contrast to this very delicious and moist cake. Serve the cake as is or drizzle with homemade caramel sauce.


Ingredients
2 cups all purpose flour
1/4 cup almond flour
2 teaspoons baking powder
1/2 teaspoon baking soda
1 teaspoon cinnamon
1/2 teaspoon ginger powder
1/2 teaspoon nutmeg
1/4 teaspoon salt
1 cup sugar
3 large eggs
3/4 cup oil
1/2 cup milk
1/2 cup plain yogurt

Topping
2 to 3 large apples such as Granny Smith peeled, cored, thinly sliced
1/4 sugar
3 tablespoons butter
1 teaspoon cinnamon
2 tablespoons water

For your pan
2 tablespoons butter
3 tablespoons almond meal


Directions
Preheat your over to 350*. Butter the edge/rim of your cake pan with 1 tablespoon of butter and dust with almond meal. Once the sides of the pan are coated, butter the bottom of the pan with the remainder of your butter, making sure the almond meal only coats the sides of the pan. Set aside.

In a heavy large skillet, melt your butter over medium heat. Add your sugar, apples,and cinnamon. Cook until the apples are caramalized turning frequently, about 15 minutes. Carefully remove your apples from the pan and allow them to cool to room temperature. Arrange decoratively in bottom of pan, pour the juices from the apples over the arranged apples. Set aside.

In a medium bowl, sift your flour, almond meal, spices, salt, baking powder, and baking soda. Set aside. In a large bowl beat your eggs and sugar with a whisk until they become fluffy and light in color, slowly stream in your oil until well combined. In a seperate bowl whisk your yogurt with the milk until lump free. Add the flour mixture and yogurt mix alternately to the egg, oil and sugar mix, in three additions, beginning and ending with the flour mixture. Pour the batter into your prepared pan and bake for approximately 40 minutes, or until cake tester comes out clean. Allow your cake to cook for approximately 15 minutes before turning over. Serve at room temperature.


You know it's good when I eat up the entire slice after it's photoshoot! :)


Martha's "Chewy Cherry-Oatmeal Cookies"


I bought a camera a couple days ago and couldn't wait to snap a picture, so last night I made these very delicious cookies and ran to my camera first thing this morning. My kids were yet to be fed, so I only snaped a couple of pictures. Let me just say I'm in love with my new toy and these lovely cookies were the perfect quick snack to make.


Ingredients
Makes about 4 dozen

1 1/4 cups all-purpose flour
1 1/2 teaspoons ground cinnamon
1 teaspoon baking soda
1/4 teaspoon freshly grated nutmeg
1/2 teaspoon salt
1 cup (2 sticks) unsalted butter, softened, or 1 cup apple butter (a healthier alternative)
1 cup packed light-brown sugar
1/4 cup honey
2 large eggs
1 1/2 teaspoons pure vanilla extract
3 cups Quaker Old-Fashioned Rolled Oats
1 cup dried cherries


Directions
Preheat oven to 350 degrees. Line 2 baking sheets with nonstick baking mats or parchment paper.

In a small bowl, whisk together the flour, cinnamon, baking soda, nutmeg, and salt; set aside. Place butter, sugar, and honey in the bowl of an electric mixer fitted with the paddle attachment; beat on medium-high speed until light and fluffy, about 4 minutes. Add the eggs and vanilla, and beat to combine. With the mixer on low, gradually add reserved flour mixture and beat until incorporated. Stir in oats and cherries.

Drop 1 tablespoon of dough at a time about 2 inches apart on prepared baking sheets. Bake until lightly golden brown, 10 to 12 minutes. Let cool on sheets for 5 minutes, then transfer cookies to a wire rack to cool completely. Cookies can be kept in an airtight container at room temperature for up to 3 days.


From The Martha Stewart Show, January 2007


12/20/2010

Vanilla bean and rose scented honey "Panna cotta"


Panna cotta (from Italian cooked cream) is an Italian dessert made by simmering together cream, milk and sugar, mixing this with gelatin, and letting it cool until set. It is generally from the Northern Italian region of Piemonte, although it is eaten all over Italy, where it is served with wild berries, caramel, chocolate sauce or fruit coulis. It is not known exactly how or when this dessert came to be, but some theories suggest that cream, for which mountainous Northern Italy is famous, was historically eaten plain or sweetened with fruit or hazelnuts. Earlier recipes for the dish used boiled fish bones in place of gelatin; sugar, later a main ingredient, would not have been widely available as it was an expensive imported commodity. After years this treat evolved into what is now a gelatin dessert, flavored with vanilla and topped with fruit or spices, and served chilled.


Ingredients
3 cups heavy cream
1 vanilla bean
1/2 cup granulated sugar
2 1/2 gelatin leaves, soaked in cold water for about 4 minutes
1/2 cup honey
1 teaspoon rosewater
Rose jam to serve (optional)


Directions
Place the cream, vanilla bean, and sugar in a saucepan and bring to a simmer. Remove from the heat.

Remove the vanilla bean and split lengthwise. Scrape the vanilla beans into the cream.

Squeeze the gelatin leaves to remove any excess water, then add them to the pan, stirring constantly about 30 seconds, or until the gelatin is melted.

In a small bowl mix your honey with 1 teaspoon of rosewater. Drizzle about 2 teaspoons honey into the bottom of 6 (4-ounce) molds. Ladle the cream mixture into each. Refrigerate for several hours, until thoroughly chilled.

To remove from the mold: Dip the bottom of the mold into a pot of hot water to loosen the panna cotta. Slide a knife around the edge, then carefully turn over onto a serving plate. Drizzle with the remaining honey and serve with Rose jam or fresh berries.


http://www.bienmanger.com/2F622_Rose_Petals_Jam.html

Adapted from, Foodnetwork.
Note, the Rosewater in the recipe is my little twist on the original recipe.

12/13/2010

Spiced oatmeal cookies


There's nothing better in a cold winter day than a nice batch of warm cookies. I'm a huge cookie fan but don't make them very often since most recipes are loaded with butter. The other night I decided to try baking cookies the healthy way by using only 2 tablespoons of butter and cutting back on the amout of sugar used and replacing it with honey. The results were "Oh my Gooooodness" Yes they were that good and did I mentions they were healthy? I say were because "I" ate the entire batch in 2 days. Oops!

Ingredients
1 1/4 cup wheat flour
2 cups oats (quick cooking)
1/2 teaspoon baking soda
1/4 teaspoon salt
1 teaspoon cinnamon
1/2 teaspoon ginger
1/2 teaspoon cardamom powder
1/4 teaspoon nutmeg
1/4 cup sugar
1/4 cup honey
1/2 teaspoon vanilla
1 egg
3 tablespoons oil
2 tablespoons melted butter
1/2 cup raisins
1/2 cup chopped walnuts
3 tablespoons choped apricots (in jam) You can also use 2 tablespoons of dry apricots and 1 tablespoon apricot jam.


Directions
Preheat oven to 350*.
In a large bowl mix your (sifted) flour, oats, baking soda, salt, and spices. Set aside. In a medium bowl mix your egg and sugar with a hand or electric mixer until light in color and creamy. Add your honey, melted butter, apricots, vanilla and oil. Mix to combine. Mix your wet and dry ingredients until well combined (make sure not to overmix). Fold in your raisins and walnuts. Drop dough by rounded tablespoons about 2 inches apart on the cookie sheets. Bake 8 to 10 minutes or until edges are lightly browned. Cool 1 minute. Remove to wire rack. Cool completely.


11/30/2010

Old fashion apple pie


Fall brings back so many memories, one of them being apple pie. Apple pie is one of my favorite desserts but something I rarely make. This past weekend I had a few friends over for dinner (Thanksgiving style meal) and eventhough I had a couple of cakes my husband ordered from a bakery I wanted to show them a real American meal and what's more American than "Apple pie"? Of course I wanted to stay on the safe side and make sure my pie came out perfect, so I cheated and used a Martha Stewarts recipe without making any changes of my own. Ok, so maybe I omitted the lemon zest but that's only because I think the juice of 1 lemon will make this pie tart enough as it is (I was right).


Makes one 9-inch double crust pie

5 tablespoons all-purpose flour, plus more for work surface
1 large egg yolk
1 tablespoon heavy cream
4 pounds assorted cooking apples, peeled, cored, and cut into 1/4-to 1/2-inch-thick slices
3 tablespoons fresh lemon juice, washed
1/2 cup granulated sugar
1/4 teaspoons ground cinnamon
1/4 teaspoon ground nutmeg
1/4 teaspoon salt
1/4 cup cold (1/2 stick) unsalted butter, ,cut into 1/2-inch pieces
Sanding sugar, for sprinkling


Directions
Turn out 1 piece of dough onto a lightly floured work surface. Roll into a 13-inch round, about 1/8 inch thick. Fit into 9-inch pie plate. Trim edges flush with rim. Freeze until firm, about 30 minutes.

Roll out remaining dough on parchment paper to a 13-inch round, about 1/8 inch thick. Transfer to a baking sheet; refrigerate until firm, about 30 minutes.

Preheat oven to 400 degrees. Whisk egg yolk and cream in a small bowl; set egg wash aside. Put apples, lemon juice, granulated sugar, flour, cinnamon, nutmeg, and salt in a large bowl; toss to combine. Fill pie shell with apple mixture, and dot with butter. Lightly brush edge of pie with a wet pastry brush. Place dough round on top of pie. Trim edges flush with rim; press to seal. Crimp edges as desired. Make four 1/2-inch slits in center of pie. Brush top with egg wash; sprinkle with sanding sugar. Freeze 30 minutes.

Place pie on a baking sheet. Bake until crust begins to turn golden brown, about 20 minutes. Reduce oven temperature to 350 degrees. Bake until crust is golden brown and juices are bubbling, about 35 minutes. Cover with foil if browning too quickly. Let cool completely on a rack.


Basic pate brisse recipe

Makes enough for one double-crust or two single crust 9-inch pies
2 1/2 cups all-purpose flour
1 teaspoon salt
1 cup cold (2 sticks) unsalted butter, cut into 1/2-inch pieces
1/4 to 1/2 cup ice water
Directions
Pulse flour and salt in a food processor. Add butter, and pulse until mixture forms coarse crumbs with some larger pieces remaining, about 10 seconds.
With machine running, add ice water in a slow, steady stream just until dough holds together without being wet or sticky, no longer than 30 seconds.
Divide dough in half, and shape into disks. Wrap in plastic; refrigerate at least 1 hour or overnight. Dough can be frozen up to 1 month; thaw in the refrigerator overnight before using

11/11/2010

Mille feuille


Mille-feuille (thousand leaf) is a custard filled French dessert that is not only popular in France but also in Maghrebi countries such as Morocco, Tunisia, and Algeria. This pastry is sold in every Moroccan bakery, young kids usually stop to grab a slice on the way home from school. When I showed my pictures to family in Morocco they were really impressed, little do they know I used store bought puff pastry instead of making it my self. Like they do! The American version of this dessert is called "Napoleon" and can be filled with anything from custard to jam. The pastry creme recipe was addapted from "The Simple Codes Behind the Craft of Everyday Cooking" its by far the best crème pâtissière recipe I have came across. When baking the pastry you can bake the entire sheet at once or cut in 3 pieces like I've done in my recipe.


Ingredients
1 cup heavy cream
1 1/2 cups of milk, divided
1 vanilla bean, split lengthwise down the middle
1/3 cup sugar
6 large egg yolks
A few cups of cold water
A few cups of ice
6 tablespoons cornstarch
1/4 cup of butter, at room temperature (1/2 a stick)

For the pastry
1 pack puff pastry such as Pepperidge Farm


Directions for your cream

Combine heavy cream with 1 cup of milk in a medium saucepan (reserve the remaining 1/2 cup of milk). Using a butter knife, scrape the tiny seeds out of the vanilla bean and add them to the cream mixture, tossing the scraped pod in as well.

Bring the cream to just a simmer, then remove from heat and allow to sit for 15 minutes. Fish out spent vanilla pod and discard.

Combine sugar and egg yolks in a medium-sized heatproof bowl and whisk vigorously for 30 seconds to ensure the sugar is dissolved.

Halfway fill a large bowl with cold water and add a few handfuls of ice to make sure the water is very cold. Keep more ice handy in case what you’ve added to the bowl melts.

In a cup, combine cornstarch with the remaining 1/2 cup of milk, stirring with a fork until cornstarch is completely dispersed. Make sure there are no lumps along the bottom of the cup, hiding anywhere in the corners, lest you end up with lumps in your pastry cream. In case you were wondering, this is called making a slurry.

Place the saucepan containing the cream mixture over a medium heat. Again bring the cream just to a simmer, making sure not to bring it to a full boil. Once you see bubbles begin to form around the edges of the saucepan and a fair amount of steam beginning to rise from the cream’s surface, remove it from the heat.

Slowly pour the hot cream into the sugar and egg yolks, whisking constantly. The goal here is to add the hot cream slowly enough that the eggs don’t scramble, so pour in a little bit at a time and whisk well before you add some more. If you’ve got another person handy, have them pour the hot cream in a slow, thin stream while you whisk.

Pour the cream and eggs back into the saucepan and stir in the cornstarch slurry, then resume constant stirring over medium heat until the mixture is very thick. Set the base of the saucepan in your bowl of ice cold water (add more ice to the water if you have to) and stir quickly until the cream has cooled somewhat but still retains some heat, about one minute.

Add the butter and stir until the butter is completely mixed in and you’ve got a smooth cream. Scoop into a bowl and cover with plastic wrap, making sure to press the wrap against the surface of the cream to prevent a skin from forming. Seal and store in the fridge until you’re ready to use it.


While the pastry creme is cooling, bake your puff pastry in 3 equal rectangular shapes.

*Roll out the puff pastry and pierce it using a fork or a docker.
Place it between 2 greased baking sheets so that it will remain flat and regular during cooking.

*Repeat this step with your other two rolled out pastry and bake at 350* for 25 minutes. When finished, leave them to cool on a cooling rack.

*Cut the edges of your baked pastries so that all 3 rectangles are equal in size using a serrated knife.

*You are now ready to assemble your mille feuille, Spread the custard on the top of your baked pastry using a metal spatula. Place the second layer of baked pastry on top and push to make sure the creme sticks to both sides of the baked pastry. Spread your second half of creme over the pastry and cover ith the last layer of baked pastry, again pushing down to make sure the creme stick to both sides. Cover the top layer with icing or dust with powder sugar. To serve cut with a serrated knife using a sawing motion.


Basic icing recipe

2 cups confectioners (powdered or icing) sugar, sifted

4 tablespoons milk or cream

Directions
Combine the confectioners sugar and milk and mix until smooth.


http://www.youtube.com/watch?v=oGQCWuKU7Co


9/14/2010

Easy Phyllo dough desserts...


Here are a couple easy to make fillo dough desserts I made for Eid ul Fitr this past weekend. Since fillo (Phillo) dough is widely used in the Middle East to make pastries, you can find it pre cut into small squares. The sheets I used were 5x5 inches which was the perfect size for making these lovely desserts. I wasn't really in the mood to spend my holiday in the kitchen so the creme and chocolate used to stuff these pastries are really simple to make. You don't really need a recipe in fact just by looking at the pictures you can pretty much figure out how these are made.


Ingredients
Fillo dough cut into 5x5 squares.
1 cup butter (melted and cooled)
Creme stuffing of your choice
Chocolate ganache or nutella spread.

Instruments needed
Creme horns metal cones
4 wooden spoons (soaked in water for 10 minutes and wrapped in foil)
Muffin pan


Directions
Using a pastry brush butter each sheet of fillo before placing one on top of the other. If you're making fillo cups, you will need 3 sheets of fillo. Fillo flutes are best when made with only 2 sheets of fillo but 3 sheets works just fine. Wrap your sheets around the wooden (foiled) spoon leaving at least one inch of fillo from the tip of the spoon, if you wrap the sheets in the center of the spoon it will be hard to slide it off without breaking. Make sure to butter your spoons, muffin pan, and metal cones before wrapping or molding your fillo sheets. When making the cones use 3 sheets of fillo and wrap around the cone, brush the edge with butter and bake edge side down. Bake pastries for approximately 10 to 15 minutes or until golden in color. Allow them to cool completely on a wire rack before stuffing.


Cream and chocolate used in my recipes.

Chocolate cream
1 cup semisweet chocolate chips
1/2 cup heavy creme
1/2 cup powder sugar

Place your chocolate chips in a small glass bowl. Heat your cream until it reaches a soft boiling point. Add the cream to your chocolate and mix until melted. Add your powder sugar and whisk to combine. Spoon your chocolate cream into a piping bag and "carefully" fill your flutes until you can see the chocolate cream from both ends of the flute.


Honey creme
1 cup heavy cream
2 tablespoons powder sugar
1 can honey flavored Arabic qashta
2 tablespoons pistachio halvah (for garnish)
candied bitter orange peel for garnish


In a medium bowl whisk your cream until soft peaks form, add the powder sugar and whisk until stiff peaks form. Fold in your qashta until well combined. Cool completely before filling your cones or cups with cream.


Metal horns


Pistachio halvah


Wooden spoons

8/31/2010

Monkey bread using my Sweet dough recipe...


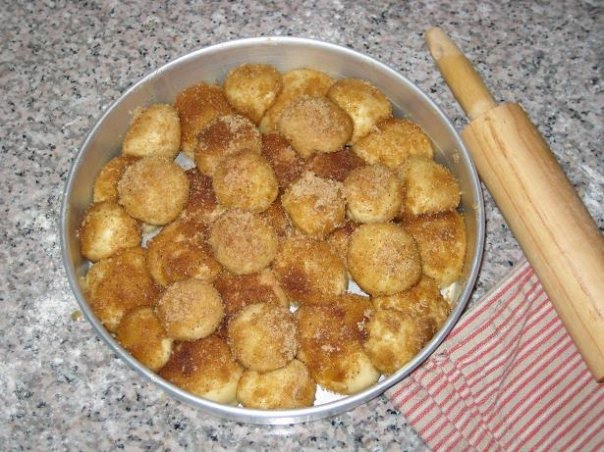
I have been meaning to share my sweet dough recipe with you all and what better way to do it than with Monkey Bread. Monkey bread, also called African coffee cake, golden crown, pinch-me cake and bubbleloaf, is a sticky, gooey pastry served in the United States for breakfast. The origin of the term monkey bread is uncertain. Possible etymologies include that the bread resembles the monkey puzzle tree, or the act of several people pulling at the bread is reminiscent of monkey behavior. Tonight I made this beautiful monkey bread for my neighbors using my all time favorite dough recipe. This dough can be used to make cinnamon buns, sweets rolls, cinnamon cresents, or any other dessert that calls for yeasted sweet dough. The technique for making Monkey bread is fairly simple so don't go getting puzzled by reading recipes that tell you to roll the dough out, cut it in small squares, roll the squares into golf size balls etc etc. All you have to do once the dough has risen the first time is flatten the dough and pinch of pieces as you go, simple as that. Below you will find a picture that shows you how to get the pieces of dough formed into the perfect little ball. Drizzle this bread with icing and top with chopped nuts and you have yourself a beautiful holiday ceterpiece.... The picture above shows you a mini Monkey bread, so expect yours to be much bigger.


Ingredients
5 to 5 1/2 cups flour
1/2 cup sugar
1/2 teaspoon salt
1 teaspoon vanilla
2 large eggs
1 cup milk
1/2 cup water
4 tablespoons butter (melted)
1/4 cup oil
1 tablespoon yeast
1 teaspoon cinnamon powder (optional)


Ingredients for the Monkey bread
1 cup melted butter
1 cup dark brown sugar
1/2 cup sugar
1 tablespoon cinnamon powder
1 cup Nuts and Raisins (optional)


Directions
Activate you yeast in 2 tablespoons lukewarm water and a pinch of sugar. Meanwhile sift your flour, sugar, and salt. Set aside. In an electric mixer (if kneeding by hand use a large bowl) add your milk, water, butter, oil, eggs, and vanilla. Mix on low speed until well blended. Add 2 cups of flour and mix on medium speed until a smooth "batter" has formed. Add your yeast and continue to mix. Switch the speed to medium low and slowly add the remainder of your flour until a smooth and sticky dough forms. The dough should still stick a little to the sides of your electric mixer but most of the dough should be sticking to your dough hook attachment. If you feel the dough is too sticky to handle, add 1 tablespoon of flour at a time. Wait 3 to 5 minutes before you handle the dough by hand. With oiled hands remove the dough from your mixer and kneed for 3 minutes on a oiled countertop. Shape the dough into a ball and place in a large, oiled bowl. Turn dough over in bowl to coat with the oil from the bowl. Cover the bowl with a kitchen towel. Let rise in a warm place until doubled in volume, about 1 hour. After the dough has risen, punch down before using.

To make the monkey bread,
Butter a bunt pan or a regular round cake pan, set aside. Mix your sugars and cinnamon in a small bowl. Metl your butter and pour into a seperate bowl. Pinch off pieces of dough to make golf size balls, pass the dough through your fingers like such,


Dip the ball into your melted butter then roll in your sugar mix, place the ball in your prepared pan and continue to do the same until you have used up the entire dough.


If you are using nuts or raisins, place them among the dough pieces as you are layering. Allow your Monkey bread to rise for approximately 45 minutes before baking.


Bake for approximately 30 minutes or until the loaf is golden in color.


Allow the loaf to cool for about 10-15 minutes before turning it over onto a plate. If it doesn’t slide right down onto the plate, give it a few taps until it plops.
It’ll hold.

Here's a picture of tonights Monkey bread made in a sunflower cake pan. I was in a rush so its only a two layer Monkey bread.

8/30/2010

Moist Chocolate cake


This cake is super moist and very easy to make. Woman here is Saudi Arabia love to buy boxed cake mixes, this cake is just as easy if not easier and better in taste than any boxed chocolate cake mix. You can even pre mix all the ingredients, place the mix in a cute jar with a label and give to your friends as a gift or pre mix and keep in your pantry for those times when you're having guest coming over and very little time to bake. I'm telling you the ingredients and method are simple but the taste is far from that. This is probably one of the first cakes I baked for my husband when we first got married, thanks to the back label of my Hershey's cocoa powder. Tonight I simply covered the cake in ganache and attempted to decorate it with a cresent moon and star. (*....


Ingredients
2 cups sugar
1-3/4 cups all-purpose flour
3/4 cup HERSHEY'S Cocoa
1-1/2 teaspoons baking powder
1-1/2 teaspoons baking soda
1 teaspoon salt
2 eggs
1 cup milk
1/2 cup vegetable oil
2 teaspoons vanilla extract
1 cup boiling water

Directions
Heat oven to 350°F. Grease and flour two 9-inch round baking pans.
Stir together sugar, flour, cocoa, baking powder, baking soda and salt in large bowl. Add eggs, milk, oil and vanilla; beat on medium speed of mixer 2 minutes. Stir in boiling water (batter will be thin). Pour batter into prepared pans.
Bake 30 to 35 minutes or until wooden pick inserted in center comes out clean. Cool 10 minutes; remove from pans to wire racks. Cool completely.


Adapted from, Hersheys...

8/28/2010

Fillo wrapped dates...


This is more of a neat idea than it is a recipe since I don't have the exact amounts. The dates you choose in this recipe is really up to you but just make sure you're using soft dates when making these rolls. The technique is the same used for the baklava rolls. When cutting the strips make sure each strip is approximately 10 inches in length and the width is wide enough to fold in each side to enclose the date. Medjool dates are the most common dates found in the USA and Europe and will work really good in this recipe. The dates I use were Sekkeri dates which are smaller in size than Medjool dates. To fancy these up you can give them a quick dip in simple syrup or clear honey and roll them in chopped toasted nuts.

Ingredients
Fillo dough sheets
Melted butter
Soft dates

Directions
Follow the same direction listed on my Baklava rolls recipe.

Baklava rolls....


These crisp nut filled rolls are simply delicious, you get all the traditional baklava flavors minus all the extra syrup blaklava tends to soak up. The filling is made a little bit different than any other Baklava cigar recipes you may find online. Most fillings are dry and don't require any wet ingredients in the mix but not mine. I like to add a few tablespoons of honey to really hold the mix together. Who wants to bite into a pastry and have the nut filling fall down all over your shirt. Not I. When using filo pastry it's very important to keep the unused sheets covered so that they don't dry out. Filo sheets vary in size from one country to the other, I'm using Middle Eastern fillo sheets which are a little bigger than those found in the USA. But really the size of the Baklava roll is entirely up to you. The size of strips I used in this recipe were approximately 5x12 inches. The correct technique is to brush each sheet with butter before placing one sheet on top of the other but I found that taking 2 sheets at a time works just as good. All you have to do is brush one side of the 2 sheets, flip it over and brush the other side and voala you just saved you a few seconds in time.


Ingredients
1 pack filo dough (thawed if frozen)
1 cup melted butter
2 tablespoons lemon juice
4 tablespoons thick clear honey
1/4 cup sugar
2 tsp cinnamon powder
4 cups wallnuts toasted and finely chopped(you can use pistachios, almonds, pecans, or hazelnuts)


For the syrup
1 1/2 cups sugar
1 cup water
1 cinnamon stick (optional)
4 tablespoon honey
1 tablespoon lemon juice
2 strips thinly pared lemon rind


Directions
To make the filling place the honey, lemon juice, and sugar in a pan and heat gently stirring continuously until it has completely dissolved. Stir in the nuts and cinnamon until the mix is evenly coated with the honey and sugar mix. Set aside. Meanwhile cut your filo pastry in (5x12 inch strips) Take two strips at a time and lighly brush each side with butter. Place 1 tablespoon of your nut filling at the base of your strips, fold the corners in diagonally to inclose the filling. Roll the pastry up in a cigar shape making sure its tighly closed. Brush the ends with more butter to prevent the cigar from opening. Place join side down on a non stick baking sheet. Repeat the process until you have used up the entire nut filling. Bake for approximately 20 minutes or until crisp and golden.

Syrup
Make your syrup either before you begin to make your rolls or while they are in the oven. Combine your sugar and water in a medium pan over medium heat. Bring the mix to a light boil or until the sugar has completely dissolved. Add your lemon rind, honey, and cinnamon stick and turn the heat down to low for 5 to 7 minutes. Once the syrup is ready stir in the lemon juice and set aside. The syrup can be poured over the ciggars once the have lighly cooled down or you can drizzle it over when ready to serve. If you're a fan or soaked pastries cut each ciggar in half and pour the syrup over, leave the ciggars until the syrup has soaked into each ciggar.


8/25/2010

"Spanish" churros with hot chocolate dunKin sauce.


We all have said it before "Why does anything fried have to be so good yet so bad for us" well these golden sticks really live up to that quote. They may not be the healthiest but let me tell you something they sit right on top of my food chain, right next to chocolate and icecream. Wiki says: Churros, sometimes referred to as a Spanish doughnut, are fried-dough pastry-based snacks, sometimes made from potato dough, that originated in Spain. They are also popular in Latin America, France, Portugal, Morocco, the United States, Australia, and Spanish-speaking Caribbean islands. There are two types of churros in Spain. One is thin (and usually knotted) and the other, especially popular in Madrid, is long and thick (porra). They both are normally eaten for breakfast dipped in hot chocolate.


Ingredients
Churros:
8 cups vegetable or olive oil
1 cup water
1/2 cup margarine or butter
1/4 teaspoon salt
1 cup all-purpose flour
3 eggs
1/4 cup sugar
1/4 teaspoon ground cinnamon, optional
Hot Chocolate:
4 ounces dark chocolate
2 cups milk
1 tablespoon cornstarch
4 tablespoons sugar
Directions
Churros: 8 cups vegetable or olive oil 1 cup water 1/2 cup margarine or butter 1/4 teaspoon salt 1 cup all-purpose flour 3 eggs 1/4 cup sugar 1/4 teaspoon ground cinnamon, optional

Hot Chocolate: 4 ounces dark chocolate 2 cups milk 1 tablespoon cornstarch 4 tablespoons sugar

Heat the oil in a deep frying pan to 360 degrees F.

To make the churro dough, heat the water, margarine, and salt to a rolling boil in a 3-quart saucepan. Add the flour and stir vigorously over low heat until mixture forms a ball, approximately 1 minute and remove from heat. Beat eggs until smooth and add to the saucepan while stirring the mixture.

Spoon the mixture into a piping bag with a star tip. Squeeze 4-inch strips of dough into the hot oil. Fry 3 or 4 strips at a time until golden brown, turning once, about 2 minutes on each side. Drain on paper towels. Mix the sugar and cinnamon in a bowl and roll the churros in the sugar mixture. Set aside until ready to serve.

To prepare the hot chocolate for dipping, place the chocolate and half the milk in a saucepan over very low heat and cook, stirring, until the chocolate has melted. Dissolve the cornstarch in the remaining milk and whisk into the chocolate with the sugar. Cook on low heat, whisking constantly until the chocolate thickens, approximately 5 minutes. Remove and whisk until smooth. Pour chocolate into cups and serve with churros.


Adapted from, FoodNetwork.com

8/04/2010

Apricot cake


This cake was so amazing I just had to make it again tonight only this time I made sure to write down the recipe for you all. In the picture above I got a little fancy with my cake but tonight I simply brushed the top with apricot preserves and sprinkled a few white chocolate and hazelnut shavings. The cake is so moist you'll think it's under baked but don't be alarmed the yogurt is what makes this cake super moist.


Ingredients

1 1/2 cups self rising flour
3/4 teaspoon baking soda
3/4 cup sugar
1 cup apricot/peach yogurt (I used activia)
2 tablespoons apricot preserves (low sugar)
2 large eggs
1/4 cup milk
1/2 cup oil (sunflower)
1 teaspoon vanilla
1/4 teaspoon salt

Directions
Preheat your oven to 350*. butter and dust a medium round cake pan. Set aside. In a medium bowl sift your flour, baking soda, and salt. Set aside. In a large bowl beat your sugar and eggs until light in color and creamy. Slowly stream in your oil until well combined. Add the yogurt, vanilla, and jam and mix to combine. Add 1/2 of the flour and mix to combine. Pour in the milk and mix before adding the 2nd half of your flour. Make sure not to over mix your batter. Pour into prepared pan and bake for approximately 40 minutes or until skewer inserted in the center comes out clean. Cool for 10 minutes before removing from the pan. Cool until warm to the touch and brush with 1 tablespoon or room temperature apricot preserves.

8/02/2010

Chocolate chip Granola bars...


Here is another lunch box favorite a sweet and chewy "CHOCOLATE" granola bar. These are so simple to make you'll think twice next time you want to buy boxed granola bars. Not only is it cheaper to make them homemade but you know exactly what goes in them.


Ingredients
1 3/4 cup quick cooking oatmeal
1 1/2 Rice Krispies cereal (or any other rice cereal)
1/2 cup chocolate chips
1/3 cup lightly packed brown sugar
1/3 cup oil
1/3 cup honey

Directions
Spray or butter and 8x8 cooking sheet. In a large bowl mix your cereal and oatmeal. Set aside. In a medium sauce pan mix together the oil, sugar, and honey. Cook and stir to a gentle boil. Pour mix into your oat and cereal mix and stir to combine, making sure all oats and cereal are fully coated. Evenly pour oatmeal mixture into prepared baking dish; sprinkle with chocolate chips. When mixture is cool enough to touch, press down into pan. Let cool to room temperature. Cut into 16 (1-by-4-inch) bars. Granola bars can be stored at room temperature in an airtight container for up to 1 week, and frozen up to six months.


adapted from, Martha Stewarts.

7/29/2010

Marshmallow rice treats...


Since it's almost back to school season for kids all over the West I thought it would be neat to share some "Classic" back to school lunchbox treats with you all. I will start with one of my favorite treats growing up and that's the "Rice Krispie" treat. These turned out so yummy, you will think they came out of a shinny blue wrapper.


Ingredients

3 1/2 cups Rice cereal (I used Rice Krispies)
2 tablespoons butter
20 large marshmallows
1/4 teaspoon vanilla


Directions
Place the rice krispies in a large bowl. Butter or spray a medium/small baking tray, set aside. Melt your butter in medium saucepan over low heat. Add marshmallows and stir until completely melted. Remove from heat. Immediately pour the mixture into your prepared pan and pat until even (you may want to wet your hands to prevent the cereal from sticking to your hands. Cool at room temperature until set, cut into squares and individually wrap with platic wrap.

© From Yeast to Zest 2010. All rights reserved